Merging and Closinga Pull Request (PR) in VS Code & GitHub Desktop
March 18th, 2026 5:37 PM Mr. Q Categories: github
Merging and Closing a Pull Request (PR) in VS Code, GitHub Desktop, or GitHub
🚀 Featured Snippet
To merge and close a pull request, open the PR on GitHub, review the Files changed tab, click the Merge pull request dropdown, choose Squash and merge, confirm the merge, delete the branch, then pull the latest changes locally and delete your local branch.
Overview
When your pull request (PR) is ready, your goal is to merge it cleanly and remove all leftover branches.
Standard workflow:
- Review the PR
- Merge it
- Delete the remote branch
- Pull latest changes
- Delete the local branch
✅ Goal
- One PR = one clean commit
- No leftover branches
- Clean, readable history
Merge Options (What Button to Choose)
Squash and Merge (Recommended)
Button label: Squash and merge
- Found under the green merge button dropdown
- Combines all commits into one
- Best for most PRs
✅ Recommended
Use Squash and merge almost every time
Create a Merge Commit
Button label: Create a merge commit
- Keeps all commits
- Adds an extra merge commit
⚠️ Use When
You want full commit history preserved
Rebase and Merge
Button label: Rebase and merge
- No merge commit
- Linear history
🚫 Caution
Avoid unless you understand rebasing
🖼️ Visual: GitHub Merge Buttons


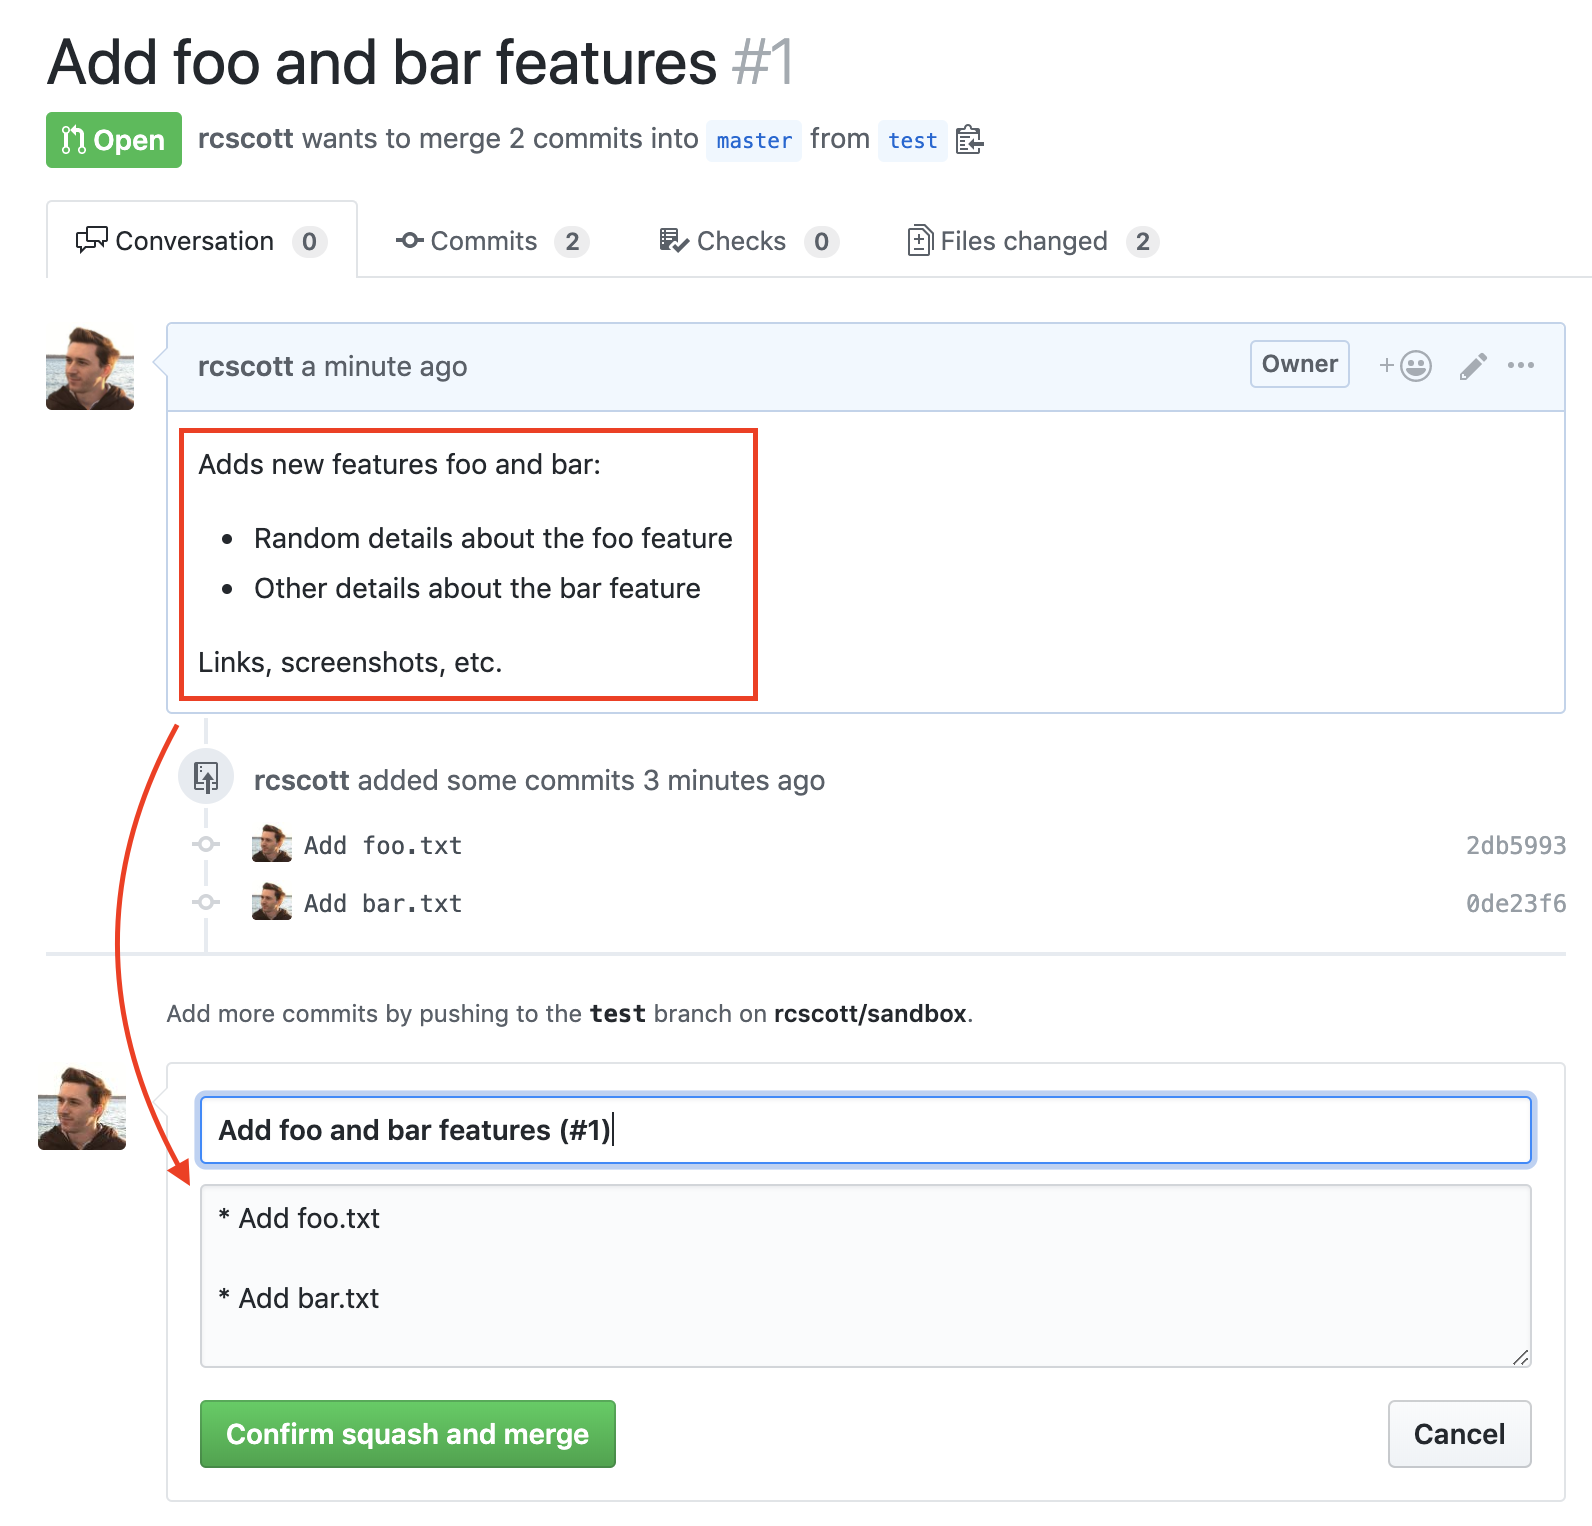
✅ Key Buttons to Recognize
- Green Merge pull request button
- Small dropdown arrow ▼ next to it
- Squash and merge option
- Confirm squash and merge button
- Delete branch button
VS Code Setup for GitHub (First-Time Users)
Step 1: Install Git
Check if installed:
git --version
If not installed:
- Download from git-scm.com
- Install with defaults
⚠️ Required
VS Code cannot manage repos without Git
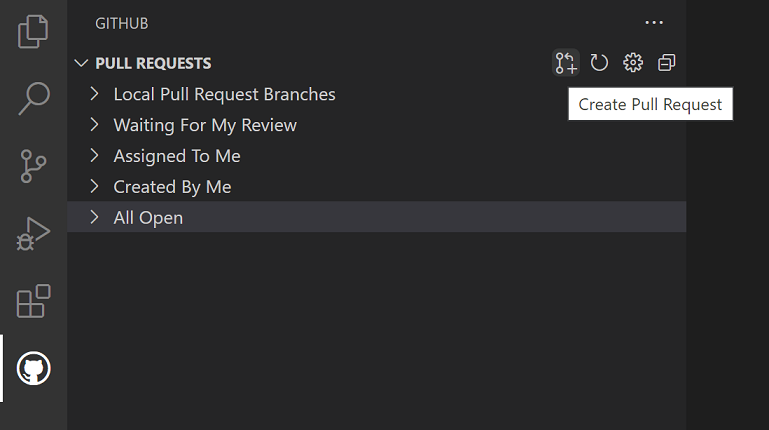
Step 2: Install GitHub Pull Requests Extension
Steps:
- Open VS Code
- Click Extensions icon (left sidebar, looks like 4 squares)
- Search:
GitHub Pull Requests and Issues - Click Install
🖼️ Visual: VS Code Extensions Panel


Step 3: Sign Into GitHub
- Look for Sign in to GitHub (bottom-left or popup)
- Click it
- Browser opens → click Authorize
⚠️ Important
If you skip this, you will NOT see pull requests
Step 4: Open Your Repository
Option A: Clone repo
Press:
Ctrl + Shift + P
Type:
Git: Clone
Paste your repo URL
Option B: Open existing repo
- File → Open Folder
- Select your repo
Step 5: Verify Git is Working
Click:
Source Control icon (branch icon 🌿)
You should see:
- Changes
- Branch name
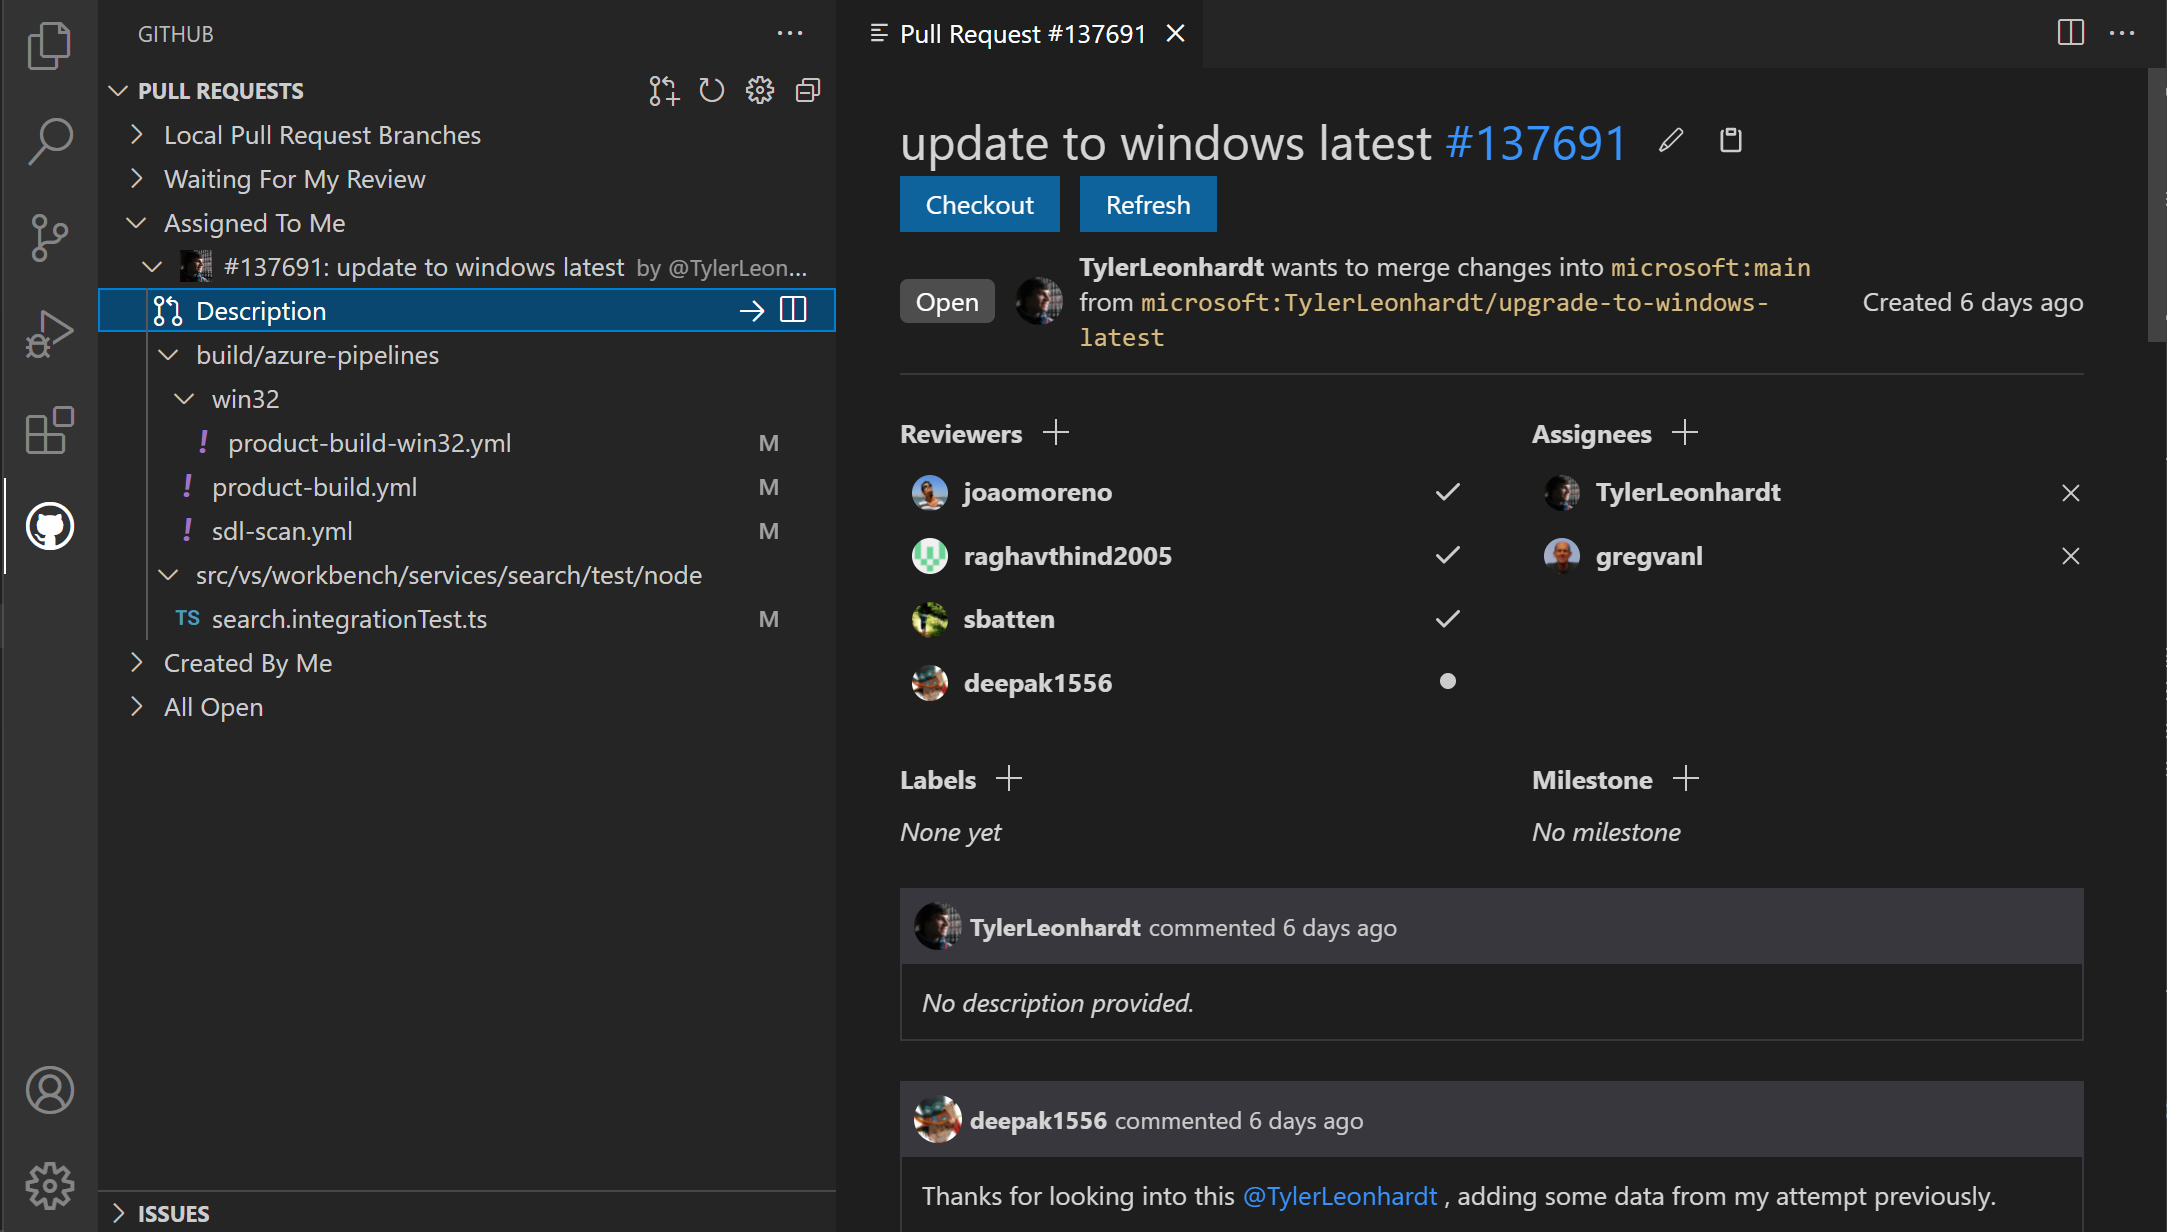
Step 6: Find Pull Requests Panel
🖼️ Visual: VS Code Sidebar + PR Panel
Option A (best):
- Click GitHub / PR icon in left sidebar
Option B:
- Click Source Control
- Look for Pull Requests section
Option C (always works):
Press:
Ctrl + Shift + P
Type:
Pull Requests
Click:
GitHub Pull Requests: Focus on Pull Requests View
🚫 Common Problem
No Pull Requests panel:
Fix:
- Install GitHub Pull Requests extension
- Sign into GitHub
- Open a repo folder
Option 1: VS Code → GitHub (Recommended Flow)
Step 1: Open PR in VS Code
- Click GitHub / PR icon
- Click your PR
Step 2: Review Changes
- Click Files Changed
- Open each file
🚫 Never Skip
Always review files before merging
Step 3: Click “Open on GitHub”
- Top-right of PR view
- Click Open on GitHub
Step 4: Merge PR (on GitHub)
Scroll to bottom:
- Click Merge pull request ▼
- Select Squash and merge
- Click Confirm squash and merge
Step 5: Delete Remote Branch
- Click Delete branch
Step 6: Update Local Repo
git checkout main
git pull
Step 7: Delete Local Branch
git branch -d your-branch-name
Option 2: GitHub Website (Easiest)
Step 1: Open PR
- Go to repo
- Click Pull requests
- Click your PR
Step 2: Review Changes
- Click Files changed
✅ Rule
If anything looks wrong → STOP
Step 3: Merge
Scroll down:
- Click Merge pull request ▼
- Select Squash and merge
- Click Confirm squash and merge
Step 4: Delete Branch
- Click Delete branch
Step 5: Update Local Repo
git checkout main
git pull
Step 6: Delete Local Branch
git branch -d your-branch-name
Option 3: GitHub Desktop
Step 1: Open Repo
- Open GitHub Desktop
Step 2: Click “View on GitHub”
- Opens PR in browser
Step 3: Merge
Follow GitHub Website steps above
Recommended Workflow
✅ Always Do This
- Open PR
- Click Files changed
- Review everything
- Click Squash and merge
- Click Confirm
- Click Delete branch
- Pull latest main
- Delete local branch
Common Mistakes to Avoid
🚫 Avoid These
- Not reviewing files
- Using wrong merge option
- Forgetting to delete branch
- Not pulling latest main
- Reusing old branches
💡 Pro Tip
- One PR = one purpose
- Squash merge keeps history clean
- Always delete branches
Summary
After a proper merge:
- PR shows Merged
- Remote branch is deleted
- Local main is updated
- Local branch is deleted
- Repo stays clean
✅ End Result
Clean repo, clean history, no leftovers